


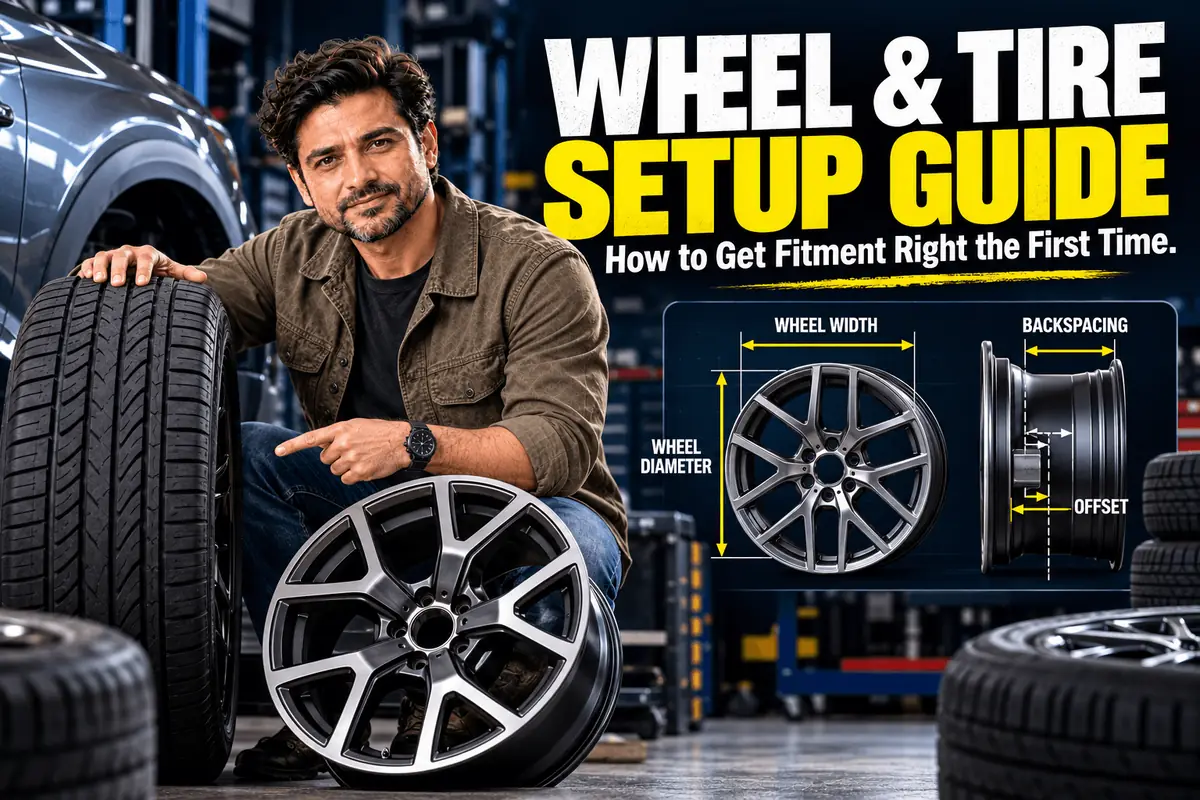
A new set of wheels looks simple on a product page: pick a diameter, pick a finish, add to cart. Then the wheels arrive and the lug nuts won’t seat, the tire rubs the strut on full lock, or the speedometer reads five miles per hour slow. Almost every one of those problems traces back to a measurement that was overlooked before the order went in.
A good wheel and tire setup comes down to a short list of numbers that have to agree with your vehicle and with each other. This guide walks through each one, from bolt pattern and offset to rim width, load index and TPMS, explains how they interact, and shows how to plan an upgrade that fits, rides well and stays safe.
Table of Contents
Why Fitment Starts With the Vehicle, Not the Wheel
The wheel decides exactly where the tire sits inside the wheel well. Move it a fraction of an inch and you change clearance to the brakes, suspension and fender, along with steering feel and bearing loads.
That is why the starting point is always your vehicle’s own specifications. The owner’s manual and the tire placard on the driver’s door jamb list the original tire size and recommended pressures. From there, the wheel numbers below tell you what will physically bolt on, and the tire numbers tell you what will safely carry the car.
The Wheel Measurements That Decide Fitment
Bolt Pattern
The bolt pattern, or lug pattern, describes how many studs the hub has and the diameter of the circle they sit on. A pattern written as 5×114.3 means five lugs on a 114.3 mm circle, the same pattern often called 5×4.5 in inches. The wheel’s pattern must match the hub exactly. Patterns that are close but not identical, such as 5×114.3 and 5×115, can look like they fit while leaving the studs loaded at an angle, which is a recipe for loosened lug nuts.
Center Bore
The center bore is the hole in the middle of the wheel that slides over the hub. On a hub-centric fitment, the bore matches the hub diameter, so the hub carries the wheel’s weight and centers it precisely. Many aftermarket wheels use a larger bore so one design fits several vehicles. In that case, hub-centric rings fill the gap and keep the wheel centered. Skipping them can cause a vibration that no amount of balancing will cure.
Diameter and Width
Wheel diameter is measured across the bead seats, where the tire actually sits, and it must match the tire’s rim diameter exactly. A 17-inch tire goes on a 17-inch wheel, with no exceptions.
Wheel width is also measured between the bead seats, not across the outer lips, so an 8-inch wheel is physically about an inch wider at its edges. Width matters for two reasons: it must suit the tire you plan to mount, and it changes how far the wheel reaches inward and outward.
Offset
Offset is the distance in millimeters between the wheel’s mounting surface and its centerline.
- Positive offset puts the mounting surface toward the street side of the wheel, tucking the wheel in under the car. Most modern front-wheel-drive cars and crossovers use positive offset.
- Zero offset puts the mounting surface exactly on the centerline.
- Negative offset puts the mounting surface toward the inboard side, pushing the wheel out. It is common on lifted trucks and off-road builds.
Lowering the offset number pushes the wheel outward, toward the fender. Raising it pulls the wheel inward, toward the suspension. Changing offset also changes the scrub radius, which affects steering feel and the leverage loads put on the wheel bearings.
Backspacing
Backspacing measures the same idea in a different way: the distance in inches from the mounting surface to the inner edge of the wheel. It tells you how much room the wheel takes up on the suspension side. Truck and off-road wheels are often sold by backspacing, while car wheels usually list offset.
The two convert with simple math. Add 1 inch to the nominal wheel width to account for the lips, divide by two, then add the offset converted to inches (offset in millimeters divided by 25.4). An 8-inch wheel with a +35 mm offset works out to about 4.5 plus 1.38, or roughly 5.9 inches of backspacing.
| Measurement | What It Is | What Goes Wrong if It Is Off |
|---|---|---|
| Bolt pattern | Number of studs and the circle they sit on | Wheel won’t mount, or lugs load at an angle and loosen |
| Center bore | Hole that centers the wheel on the hub | Vibration if the wheel isn’t hub-centric and no rings are used |
| Diameter | Bead seat diameter in inches | Tire can’t mount; must match exactly |
| Width | Distance between bead seats | Tire bead and sidewall sit wrong; clearance changes |
| Offset | Mounting surface relative to centerline, in mm | Rubbing on suspension or fenders; altered steering feel |
| Backspacing | Mounting surface to inner lip, in inches | Contact with struts, control arms or brake parts |
Lug Nut Seats and Brake Clearance
Lug nuts and bolts come with conical, ball or flat seats, and the seat must match the wheel or the fastener won’t clamp correctly. Aftermarket wheels often need different hardware than factory wheels.
Brake clearance is the second. Large calipers, especially on performance models, can hit the inner spokes of a wheel that otherwise fits. Many wheel makers publish caliper templates, and a test fit on the hub before tires are mounted is cheap insurance.
Reading the Tire Size and Ratings
A sidewall code like 215/65R16 95H contains everything you need to match a tire to a wheel and a vehicle.
| Code Element | Meaning in 215/65R16 95H |
|---|---|
| 215 | Section width in millimeters, sidewall to sidewall |
| 65 | Aspect ratio: sidewall height is 65 percent of the width |
| R | Radial construction |
| 16 | Fits a 16-inch wheel |
| 95 | Load index: 1,521 lbs per tire at the specified pressure |
| H | Speed rating: 130 mph |
Aspect Ratio and Ride
Aspect ratio shapes both the tire’s total height and how it behaves. A lower ratio, such as 45 or 40, means a shorter, stiffer sidewall that sharpens steering response but transmits more of the road into the cabin and leaves the wheel more exposed to pothole damage. A taller ratio, such as 65 or 70, cushions bumps better and protects the rim, with a little less precision on turn-in.
Load Index
The load index is a number that translates to the maximum weight one tire can carry when properly inflated. A replacement or upsized tire should have a load capacity equal to or greater than the original equipment tire. Extra Load (XL) tires carry more weight than Standard Load tires of the same size, but only at higher inflation pressures, so swapping between the two may require a pressure adjustment. Overloading a tire builds heat, wears it faster and raises the risk of a blowout.
Speed Rating
The speed rating letter shows the highest sustained speed the tire is rated for under its rated load. Common ratings include T at 118 mph, H at 130 mph, V at 149 mph, W at 168 mph and Y at 186 mph. You may never drive near those speeds, but the rating also reflects how well the tire handles heat, so the safe practice is to match or exceed the rating your vehicle came with.
Matching the Tire to the Wheel Width
Every tire size has an approved range of rim widths set by industry standards bodies such as the Tire and Rim Association. A 215/65R16, for example, is approved for wheels from 6 to 7.5 inches wide. Inside that range, the bead seats correctly and the sidewall holds its intended shape.
On a rim that is too narrow, the sidewall bulges and steering feels vague. Too wide, and the sidewall is stretched taut, leaving the bead easier to unseat and the rim edge exposed. Tire makers publish the approved range for each size. Our guide to whether a 235 tire fits a 6-inch wheel works through a real example of this question.
Rule of thumb: the wheel width must fall inside the tire’s approved rim range. If it doesn’t, change the tire size or the wheel, not the rule.
Plus-Sizing Without Breaking Anything
Plus-sizing means fitting a larger-diameter wheel while dropping to a lower-profile tire so the tire’s total diameter stays nearly the same. Going from a 16-inch wheel to 17 inches is “plus one,” to 18 inches is “plus two.” Done well, it adds a wider footprint and sharper steering. Done poorly, it throws off the speedometer, overloads the tires or creates rubbing.
Continental’s plus-sizing guidelines capture the essentials:
- Choose a tire with a load capacity equal to or greater than the original tire.
- Match or exceed the original speed rating.
- Keep the change in rolling circumference under 3 percent, which protects speedometer accuracy and the function of the stability and braking systems.
- Use only industry-approved tire and rim width combinations.
- Confirm body and chassis clearance at full suspension travel, full steering lock and under load.
- On AWD and 4WD vehicles, keep identical tire sizes on all four wheels.
Bigger wheels and lower-profile tires usually cost more, ride firmer and are easier to damage on potholes. Our guide to rim prices covers what to budget for different wheel sizes and materials. If you want bigger tires on a truck or SUV rather than bigger wheels, our guide to fitting bigger tires without a lift explains the clearance and offset choices involved.
Staggered Setups
A staggered setup runs wider wheels and tires on the rear axle than on the front. It is common on rear-wheel-drive sports cars and performance sedans, where the wider rear tires help put power down and the front-to-rear balance shapes how the car handles at the limit.
The catch is maintenance. Because front and rear sizes differ, tires can’t rotate front to back, though non-directional tires can sometimes swap side to side. Expect to replace front and rear pairs on separate schedules. If your car came staggered, keep it that way, since its handling balance is built around that setup.
TPMS and Your New Wheels
Federal rules under the TREAD Act require a tire pressure monitoring system on light vehicles with a gross vehicle weight rating of 10,000 lbs or less, and the requirement covered every new light vehicle from September 1, 2007. Your wheel swap has to keep that system working.
There are two types. Direct TPMS uses a sensor inside each wheel, usually attached to the valve stem, so new wheels need sensors moved over or new ones installed, and those sensors may need to be programmed or relearned to the car. Indirect TPMS has no sensors in the wheels and estimates pressure from wheel speed data, so it typically needs only a reset after new tires or wheels go on. Check which system you have before buying, and budget for sensors if needed. Winter wheel sets on direct-TPMS cars need their own sensors too, or the warning light will stay on all season.
Pressure, Installation and Maintenance
Set Pressure From the Placard
Inflate to the pressure on the door jamb placard, not the number molded into the sidewall, which is the tire’s maximum. Check pressure at least once a month and before long trips, when the tires are cold: after the car has sat for at least three hours or has been driven less than a mile. Heavier loads may call for the higher pressures listed on the placard or in the owner’s manual.
Mount, Balance and Torque Correctly
Balance every new assembly when it is mounted. Tighten lug nuts to the vehicle’s specified torque in a star pattern with a torque wrench, and recheck them after the first 50 to 100 miles. Replace damaged or corroded studs first, and get an alignment check if offset or tire size changed.
Keep Up With Rotation and Inspection
Rotate on the schedule in your owner’s manual, commonly every 5,000 to 7,500 miles, and rebalance if a new vibration appears. Replace tires at 2/32 inch of tread, the legal minimum in most states, or sooner if you see cracks, bulges or cuts, and replace bent or cracked wheels. If you replace only two tires, put the new pair on the rear axle for stability.
A Pre-Purchase Fitment Checklist
- Confirm the bolt pattern matches the hub exactly.
- Check the center bore, and order hub-centric rings if the wheel bore is larger than the hub.
- Verify offset or backspacing against what your vehicle tolerates, including any suspension changes.
- Make sure the wheel clears your brake calipers.
- Confirm the tire size is approved for the wheel width.
- Keep the new tire’s rolling circumference within 3 percent of the original.
- Match or exceed the original load index and speed rating.
- Get the correct lug nuts or bolts for the wheel’s seat type.
- Plan for TPMS sensors and programming if your car uses direct TPMS.
Related Reading
Frequently Asked Questions
Both describe where the wheel’s mounting surface sits. Offset measures it from the wheel’s centerline in millimeters, while backspacing measures it from the inner edge of the wheel in inches. One can be converted to the other once you know the wheel width.
Sometimes. The new tire size must list your wheel’s width inside its approved rim width range, and it must clear the suspension and fenders. A tire much wider than the rim range allows will have a pinched, bulging profile that hurts handling and stability.
You need them when your wheel’s center bore is larger than your vehicle’s hub. The rings center the wheel on the hub, which prevents the vibration that can occur when a wheel is centered only by the lug nuts.
The common guideline is to keep the change in rolling circumference under 3 percent of the original. Larger changes affect speedometer accuracy and can interfere with stability and braking systems calibrated to the original size.
On a car with direct TPMS, yes, unless the sensors are moved to the new wheels or new sensors are installed and programmed. Cars with indirect TPMS usually just need a system reset after the change.
Not front to back, because the front and rear tires are different sizes. Non-directional tires can sometimes be swapped side to side on the same axle, but expect to replace front and rear tires on different schedules.
Getting the Setup Right
A wheel and tire setup succeeds or fails on details that never show up in product photos. The bolt pattern and center bore decide whether the wheel mounts properly. Offset, backspacing and brake clearance decide whether it fits. Rim width, load index, speed rating and rolling circumference decide whether the tire works safely on that wheel and that car.
Close to stock, the door placard and owner’s manual will steer you right. For plus-sizing or a more aggressive stance, run every number on the checklist and have a tire professional confirm clearance. The best setup is the one that looks right on day one and still rides, steers and wears the way it should a few years later.
 Summarize this article with:
















Leave a comment